


Photo by RetroSupply on Unsplash
How to set up a local Kubernetes cluster "The bare-metal way"
Creating virtual machines with Hyper-V and cluster with kubeadm


Intro
Several months ago I transitioned into more of a DevOps role for my current client and as I do with most of the technologies that I work with I like to experiment in my free time to increase productivity.
My initial plan is to build the infrastructure for a monorepo1 hosted microservices architecture, but will see how this evolves and what other nice use cases will add 😊
I’m really excited about this series and I've got a lot of interesting things to add so that being said, let's start!🤩
What will these series cover?
- Setting up local k8s cluster
- CI/CD pipeline
- GitOps
- Load Balancing
- Networking
- Cool tools & tech
Initially, I want to go through the process of creating a local Kubernetes cluster. Unfortunately, I don’ have a bare-metal server at my disposal, so I will set it up on my local windows PC using Hyper-V manager to create the VMs and kubeadm to manage the cluster.
There are multiple easier ways to set up a local k8s environment, but I’ve chosen to go this path because I feel there's much more to learn from the raw experience. If you want to check a different way of setting up the cluster try looking into minikube or kind, I think those are the most popular ones.
Setting up local k8s cluster
For creating the VMs I have got the commands from Marcel Dempers repo. He also has a great tutorial on how to run a local cluster with Rancher on Youtube and countless other cool tutorials so I suggest go check him up.😊
Before you start make sure you have hardware virtualization enabled in your BIOS and Hyper-V manager up and running.
NOTE: as far as I know Hyper-V requires at least Windows Pro version. An alternative would be to use VMware or VirtualBox
Creating the virtual machines
I will use a basic configuration of one master and 2 worker nodes so I will create 3 VMs, but feel free to adapt to your own needs.
- Download ubuntu image
- Open Powershell as admin
- Run
Get-NetAdapterand copy the name of your active internet adapter. Most likely it's 'ethernet', but for me it's Wi-Fi. - Run
$ethernet = Get-NetAdapter -Name "Wi-Fi" - Run
Import-Module Hyper-V - Run
New-VMSwitch -Name "virtual-network" -NetAdapterName $ethernet.Name -AllowManagementOS $true -Notes "shared virtual network interface"
- Run
- Create 3 folders & virtual hard drives.
mkdir E:\VMs\k8s1 mkdir E:\VMs\k8s2 mkdir E:\VMs\k8s3 New-VHD -Path E:\VMs\k8s1\k8s1.vhdx -SizeBytes 20GB New-VHD -Path E:\VMs\k8s2\k8s2.vhdx -SizeBytes 20GB New-VHD -Path E:\VMs\k8s3\k8s3.vhdx -SizeBytes 20GB - Create 3 VMs.
New-VM ` -Name "k8s1" ` -Generation 1 ` -MemoryStartupBytes 2048MB ` -SwitchName "virtual-network" ` -VHDPath "E:\VMs\k8s1\k8s1.vhdx " ` -Path "E:\VMs\k8s1\" New-VM ` -Name "k8s2" ` -Generation 1 ` -MemoryStartupBytes 2048MB ` -SwitchName "virtual-network" ` -VHDPath "E:\VMs\k8s2\k8s2.vhdx " ` -Path "E:\VMs\k8s2\" New-VM ` -Name "k8s3" ` -Generation 1 ` -MemoryStartupBytes 2048MB ` -SwitchName "virtual-network" ` -VHDPath "E:\VMs\k8s3\k8s3.vhdx " ` -Path "E:\VMs\k8s3\" - Set up the DVD drives to use the Ubuntu ISO you downloaded.
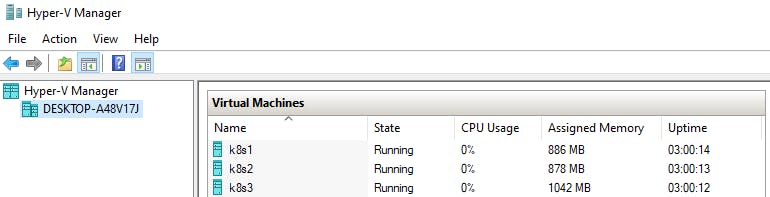
Set-VMDvdDrive -VMName "k8s1" -ControllerNumber 1 -Path "E:\VMs\ubuntu-20.04.4-live-server-amd64.iso" Set-VMDvdDrive -VMName "k8s2" -ControllerNumber 1 -Path "E:\VMs\ubuntu-20.04.4-live-server-amd64.iso" Set-VMDvdDrive -VMName "k8s3" -ControllerNumber 1 -Path "E:\VMs\ubuntu-20.04.4-live-server-amd64.iso" - Open Hyper-V manager interface and start the VMs.
You should see something similar to this:
Finish Ubuntu installation
Now that you've created and started the machines, you should be prompted with the Ubuntu installation wizard.
I suggest you leave all the defaults and only make sure you set up a root account and check the install OpenSSH checkbox.
We need OpenSSH to enable us to use copy-paste later on in the terminal because this doesn't work by default when you start the session from Hyper-V manager.
After installation is finished, you will receive an error in the terminal. Just close the window and open again and ubuntu should boot.
Create k8s cluster using kubeadm
First, let's try to establish ssh connection to our VMs in order to be able to use the great power of copy-paste🙏
Establish SSH connection
- Connect to each VM from Hyper-V manager to get the IP address
- In the terminal run
sudo apt update sudo apt install net-tools sudo ifconfig - Open Powershell and run
ssh k8s1@192.168.1.222
Set up cluster
SSH into all 3 VMs and execute the following:
sudo su
apt update && apt upgrade -y
# install curl
apt -y install curl apt-transport-https
# add key to verify release
curl -s https://packages.cloud.google.com/apt/doc/apt-key.gpg | sudo apt-key add -
# add kubernetes repo
echo "deb https://apt.kubernetes.io/ kubernetes-xenial main" | sudo tee /etc/apt/sources.list.d/kubernetes.list
# install kubelet, kubeadm and kubectl
apt update && apt install -y kubelet kubeadm kubectl
# ensure packages will not be updated/removed automatically
sudo apt-mark hold kubelet kubeadm kubectl
# install docker
apt install docker.io
# disable swap
sed -i '/ swap / s/^\(.*\)$/#\1/g' /etc/fstab
swapoff -a

# ensure docker runs under systemd cgroup driver by creating the following config file
cat > /etc/docker/daemon.json
# paste the following content
{
  "exec-opts": ["native.cgroupdriver=systemd"]
}
# restart docker
systemctl restart docker
Execute these commands only on the master node:
# make sure you replace IP_ADDRESS with master node IP address
kubeadm init --apiserver-advertise-address=IP_ADDRESS --pod-network-cidr=10.244.0.0/16
# copy config file for kubectl to connect
mkdir -p $HOME/.kube
sudo cp -i /etc/kubernetes/admin.conf $HOME/.kube/config
sudo chown $(id -u):$(id -g) $HOME/.kube/config
# install CNI(container network interface) plugin. I chose kube-flannel
kubectl apply -f https://raw.githubusercontent.com/coreos/flannel/master/Documentation/kube-flannel.yml
# get the kubeadm join command and copy it
kubeadm token create --print-join-command
#should be a command similar to this one
kubeadm join 192.168.1.222:6443 --token wb04ka.g5l8i3zv8i9r1fx4 \
        --discovery-token-ca-cert-hash sha256:f4d985e3f7dc9a0125de93edfbfdc66d9de0143dea366c4e4655c8a6182dea0d
On the 2 worker nodes run the join command you previously copied:
# dont run this command, it's an example
kubeadm join 192.168.1.222:6443 --token wb04ka.g5l8i3zv8i9r1fx4 \
        --discovery-token-ca-cert-hash sha256:f4d985e3f7dc9a0125de93edfbfdc66d9de0143dea366c4e4655c8a6182dea0d
If everything is ok you should see all your nodes when you run kubectl get nodes on your master node.
If you want to run kubectl commands from your worker nodes you need to create the same config file that you did on master.
# copy content of the config file from master node
cat $HOME/.kube/config
# run on worker nodes
mkdir -p $HOME/.kube && cd $HOME/.kube
# create config file and paste content you copied
cat > config
# change permission
sudo chown $(id -u):$(id -g) $HOME/.kube/config
Voila!🎉 This is it, you have your own kubernetes cluster. Good job!🥂
If you encounter any issues drop me a message and I'll try to assist.
Appreciate any feedback, good or bad just let me know 😊
Thank you for reading and stay close for the next one, which should be more exciting.
- Monorepo is a single repository that stores all your projects.↩